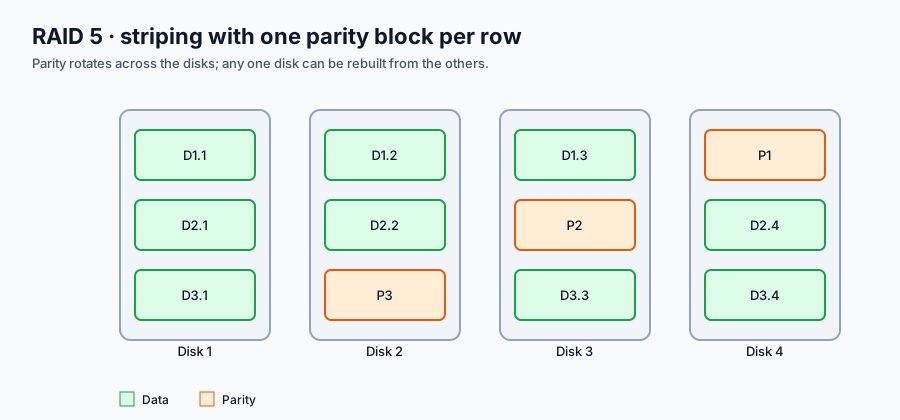
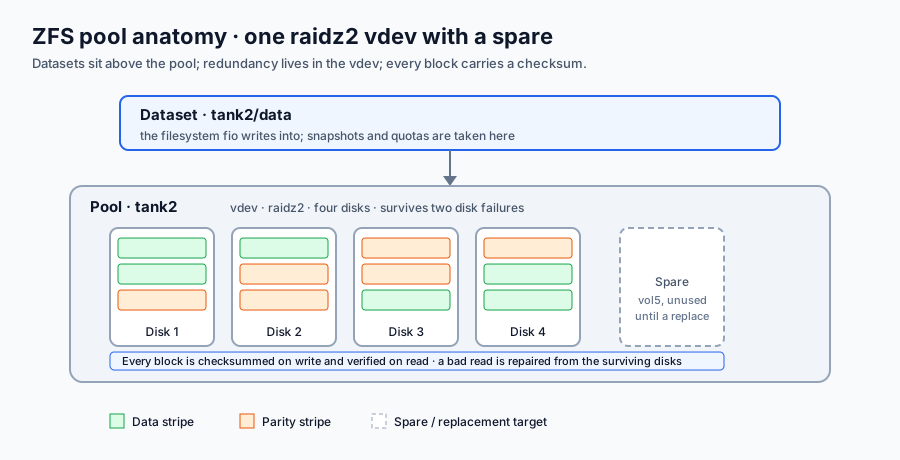
Lab: Volumes, RAID 5/6/10 and ZFS. PLO: PLO2 / PLO1. Points: 7.
Prerequisite: The DigitalOcean account, project and token from Session 1; the lab creates its own Block Storage volumes and tears them down. Set it up in Session 0: Accounts.
Lab — Volumes, RAID 5/6/10 and ZFS
Time: 120 minutes — 10 setup, 10 packages and baseline, 50 for the five arrays (10 each), 10 buffer, 20 evidence, 10 teardown.
Prerequisite: the S1 account, project and SSH key; the S2 habit of deleting what you create. The S2 Droplet is already gone, so this lab creates its own.
You need to know: a block volume is a raw disk attached to one Droplet, and it bills until it is deleted. mdadm builds a software RAID array from several volumes; ZFS builds a pool from vdevs. RAID and raidz keep a service online when a disk fails, but they do not restore a deleted file. A rebuild or resilver is the promise under test: the array is not protected until the repair has finished and the state is clean.
Cost ceiling: $0.20 — an s-2vcpu-4gb Droplet for about two hours at $0.036/hour, plus 50 GiB of volumes at $0.10/GiB-month for the same two hours. Detached volumes still bill, so the teardown deletes all five.
Safe-data acknowledgement: I have read the lab safe-data policy. I will use only the course-supplied synthetic media and will not upload real personal media to any cloud service.
Task
Build five 10 GiB Block Storage volumes, benchmark a local-disk and a single-volume baseline, then create and measure mdadm RAID 5, RAID 6 and RAID 10 and ZFS raidz1 and raidz2. Fail or offline one disk in every array, watch the rebuild or resilver finish, compare capacity and throughput, and tear everything down.
What you submit (ten items):
summary.csv and the raw fio JSON files.- The
lsblk output and the whole-disk by-id list.
- Each mdadm array's
--detail and /proc/mdstat in normal, degraded and rebuilt states.
- The RAID10
--fail → --remove → --zero-superblock → --add sequence.
- Each ZFS pool's
zpool status in normal, degraded, resilvering and completed states.
- The capacity table and
storage_results.json from the notebook.
- The sanitized command log.
- The empty Droplet, volume and firewall lists plus
doctl balance get.
- The 150–250-word "what this proves" note.
- Your terminal transcript, if you keep one.
Scored 3/2/1/0: 3 = all five arrays built, all seven configurations measured, every repair clean, teardown and cost respected; 2 = one check missing; 1 = partial or no teardown; 0 = nothing, unsafe data, or billed resources left behind.
Path note. This brief is the step-by-step path: type each command and read what it prints. The verified reference run is run.sh + remote.sh + verify.sh in this folder; COMMANDS.md is its sanitized command record. Do not run the script in place of the steps — the observation is the lab.
Reference-run control only. These commands are how run.sh drives the phases; the learner never types them.
scp -i <private-key> remote.sh root@<droplet-ip>:/root/remote.sh
ssh -i <private-key> root@<droplet-ip> "FIO_RUNTIME=10 bash /root/remote.sh base"
ssh -i <private-key> root@<droplet-ip> "FIO_RUNTIME=10 bash /root/remote.sh raid5"
ssh -i <private-key> root@<droplet-ip> "FIO_RUNTIME=10 bash /root/remote.sh raid6"
ssh -i <private-key> root@<droplet-ip> "FIO_RUNTIME=10 bash /root/remote.sh raid10"
ssh -i <private-key> root@<droplet-ip> "FIO_RUNTIME=10 bash /root/remote.sh zfs1"
ssh -i <private-key> root@<droplet-ip> "FIO_RUNTIME=10 bash /root/remote.sh zfs2"
ssh -i <private-key> root@<droplet-ip> "FIO_RUNTIME=10 bash /root/remote.sh summary"
Before you start: credentials and the panel path
0.1 Create a scoped token (panel only)
Panel: API → Tokens → Generate New Token, name it course-s3-<id>, expiry 90 days, and grant the custom scopes:
droplet:read, droplet:create, droplet:deleteblock_storage:read, block_storage:create, block_storage:deleteblock_storage_action:readtag:read, tag:createfirewall:read, firewall:create, firewall:deletessh_key:read (ssh_key:create is only needed if you let the reference run import its throwaway key)project:read, project:assign_resourceimage:read, region:read, size:read, action:readaccount:read and billing:read (for account get and balance get)
Token creation has no CLI path; the panel is the only route. Copy the token once — the panel will not show it again. The scopes are the least privilege this lab needs; block_storage:* is the volume scope name, not volume:*.
0.2 Point doctl at the token
doctl auth init --context course-s3
What it does: starts an interactive prompt that stores the token in a named doctl context called course-s3, so you do not paste the token into every command. The token itself is never written into this repository.
export DIGITALOCEAN_CONTEXT=course-s3
What it does: selects that context for this shell. If you close the terminal, export it again; the token stays in the config file.
0.3 Confirm the account and that nothing is left over
doctl account get
What it does: proves the token works and shows the account's Droplet limit. Look at the status column: it must be active, and the limit must be at least 3.
doctl compute volume list --format ID,Name --no-header
What it does: lists existing volumes. Expected: no output. A volume from an earlier lab that is still present is billing; delete it before you add five more.
doctl compute droplet list --format ID,Name --no-header
What it does: confirms no Droplet is running. Expected: no output.
doctl compute image list --public --format Slug --no-header | grep -qx rockylinux-10-x64
What it does: confirms the Rocky Linux 10 image slug exists in the region catalogue. Expected: no output and exit status 0; a printed error means the slug has changed.
doctl projects list --format ID,Name,IsDefault --no-header
What it does: shows the project UUID that the Droplet will join. Copy the UUID; you will pass it as <project-uuid> below.
1.1 Choose the SSH key
doctl compute ssh-key list --format ID,Name,FingerPrint --no-header
What it does: lists the keys already in the account. Use the S1 key's fingerprint; the private key stays on your laptop.
Matching fingerprints. doctl and the Control Panel show MD5 fingerprints (aa:bb:…), while ssh-keygen prints SHA256 by default (SHA256:…). Match the key by its name in the list, or ask ssh-keygen for the same form if you are comparing by hand:
ssh-keygen -E md5 -lf ~/.ssh/id_ed25519.pub
What it does: prints the MD5 fingerprint of your public key in the form the DigitalOcean list uses, so the comparison is exact.
Reference run only. The unattended runner cannot use your private key, so it generates a throwaway key and imports it:
ssh-keygen -t ed25519 -N "" -C course-<id>-s3 -f .ssh/id_ed25519
What it does: creates a new ed25519 key pair under .ssh/ in this folder with no passphrase, for the runner only. The .ssh/ directory is gitignored and is deleted at teardown.
doctl compute ssh-key list --format FingerPrint --no-header
What it does: checks whether the throwaway key is already in the account, so the runner imports it only once and does not create duplicates on a retry.
doctl compute ssh-key import course-<id>-s3-key --public-key-file .ssh/id_ed25519.pub
What it does: uploads the public half so the Droplet will accept the matching private key. The runner deletes this key at teardown.
doctl compute ssh-key list --format ID,FingerPrint --no-header
What it does: shows the numeric key ID that droplet create needs. Put it in <key-id>.
Panel: Networking → Tags → Create Tag.
doctl compute tag create course:42-05-0112
What it does: creates the course tag. The firewall below targets Droplets by the week:3 tag, and a firewall cannot reference a tag that does not exist yet.
doctl compute tag create student:<id>
What it does: tags this student's resources so they can be found and deleted together.
doctl compute tag create week:3
What it does: creates the tag the firewall attaches to. Every resource in this lab carries all three tags.
1.3 Create the firewall
Panel: Networking → Firewalls → Create Firewall, name course-<id>-s3-fw, inbound SSH (22) from your IP, outbound all, and apply it to the tag week:3.
MYIP=$(curl -s https://api.ipify.org)
What it does: stores your public IP in a shell variable. The firewall should admit SSH only from this address, not from the whole internet.
doctl compute firewall create --name "course-<id>-s3-fw" \
  --inbound-rules "protocol:tcp,ports:22,address:$MYIP/32" \
  --outbound-rules "protocol:tcp,ports:0,address:0.0.0.0/0 protocol:udp,ports:0,address:0.0.0.0/0 protocol:icmp,ports:0,address:0.0.0.0/0" \
  --tag-names "week:3" --format ID --no-header
What it does: creates a default-deny firewall that admits inbound TCP 22 from your IP only, allows all outbound traffic, and applies to Droplets carrying the week:3 tag. Save the ID it prints for teardown. If you do this in the panel instead, the CLI form beside it produces the same rules.
Step 2 — Five 10 GiB volumes
Panel: Volumes → Create Volume, region SGP1, size 10 GiB, name course-<id>-s3-vol1 … vol5. The panel cannot set tags on volumes; add them with the CLI in this step or from Volumes → the volume → Tags.
doctl compute volume create course-<id>-s3-vol1 --region sgp1 --size 10GiB \
  --desc "course 42-05-0112 S3" --tag "course:42-05-0112,student:<id>,week:3" \
  --format ID --no-header
What it does: creates the first 10 GiB volume in Singapore. It bills from this moment, whether or not it is attached.
doctl compute volume create course-<id>-s3-vol2 --region sgp1 --size 10GiB \
  --desc "course 42-05-0112 S3" --tag "course:42-05-0112,student:<id>,week:3" \
  --format ID --no-header
What it does: creates the second volume with the same region, size and tags.
doctl compute volume create course-<id>-s3-vol3 --region sgp1 --size 10GiB \
  --desc "course 42-05-0112 S3" --tag "course:42-05-0112,student:<id>,week:3" \
  --format ID --no-header
What it does: creates the third volume, the last member S3's raidz1 pool needs.
doctl compute volume create course-<id>-s3-vol4 --region sgp1 --size 10GiB \
  --desc "course 42-05-0112 S3" --tag "course:42-05-0112,student:<id>,week:3" \
  --format ID --no-header
What it does: creates the fourth volume, the spare that replaces a failed member in the RAID layouts.
doctl compute volume create course-<id>-s3-vol5 --region sgp1 --size 10GiB \
  --desc "course 42-05-0112 S3" --tag "course:42-05-0112,student:<id>,week:3" \
  --format ID --no-header
What it does: creates the fifth and final volume. Collect all five IDs; the Droplet step consumes them as one comma-separated list.
doctl compute volume list --format ID,Name,Size --no-header
What it does: confirms five volumes exist and shows their IDs. Check that each is 10 GiB and in sgp1; a volume in another region cannot attach to this Droplet.
doctl compute volume list --format ID,Name --no-header | awk '/course-<id>-s3-vol/ {print $1}' | paste -sd, -
What it does: filters the list client-side and joins the IDs into one comma-separated string for the Droplet create command. volume list has no tag filter, so awk does the matching.
Step 3 — The Droplet with its volumes
Panel: Create Droplet → SGP1, Rocky Linux 10 ×64, Basic / Regular / s-2vcpu-4gb, select your SSH key, add the three tags. Attach the volumes either at creation (Add Block Storage) or afterwards from Volumes → Attach to Droplet; the CLI form below attaches them at creation so they are present on first boot.
doctl compute droplet create course-<id>-s3 --region sgp1 --image rockylinux-10-x64 \
  --size s-2vcpu-4gb --ssh-keys <key-id> \
  --tag-names "course:42-05-0112,student:<id>,week:3" \
  --volumes <vol1-id>,<vol2-id>,<vol3-id>,<vol4-id>,<vol5-id> \
  --project-id <project-uuid> --wait --format ID --no-header
What it does: creates the Droplet and attaches all five volumes in one API call, then waits for it to boot. --wait polls the Droplet until it is active. Drop --project-id if you are not using a project.
doctl compute droplet get <droplet-id> --format PublicIPv4 --no-header
What it does: prints the Droplet's public IP directly. Use this or the list command below; the IP is what SSH and the firewall rule refer to.
doctl compute droplet list --format ID,Name,PublicIPv4 --no-header
What it does: shows the Droplet's public IP; that IP is what the firewall allows SSH from, and what you pass to ssh.
doctl compute droplet list -o json > results/droplet-before.json
What it does: saves the pre-lab resource state as evidence. This is the "before" half of the teardown proof.
doctl compute volume list -o json > results/volume-before.json
What it does: saves the five attached volumes and their Droplet links as evidence.
doctl compute firewall list -o json > results/firewall-before.json
What it does: saves the firewall list before the lab so the teardown proof shows your rule and then its removal.
ssh -i <private-key> root@<droplet-ip>
What it does: opens a root shell on the Droplet. Everything in steps 4–12 runs inside that shell; the doctl commands in steps 8 and 13 run on your laptop.
dnf -y install mdadm fio xfsprogs jq
What it does: installs the RAID tool, the benchmark, the XFS formatter and jq for parsing fio's JSON. Rocky's repositories carry all four.
uname -a
What it does: records the running kernel; the ZFS DKMS build depends on this exact version, so the evidence should show it.
df -h
What it does: records the filesystem layout before any volume is formatted, so the before/after difference is visible.
dnf repolist
What it does: lists the enabled repositories. If the ZFS repository is missing after the release package install, this is where you see it.
mokutil --sb-state
What it does: reports Secure Boot state. DigitalOcean Droplets normally have it off; if it is on, the unsigned ZFS module will not load and the install needs the fallback path.
ls -1 /dev/disk/by-id/scsi-0DO_Volume_* | sort
What it does: lists the devices the five volumes appear as. Use only the names without -part: the whole disk belongs to the array and must not carry a partition table.
lsblk -o NAME,SIZE,TYPE,SERIAL,MOUNTPOINT
What it does: shows size, type and mount point for every block device. Confirm five 10 GiB disks and no mount points on them; save the output as evidence.
4.1 Pre-lab ZFS install
This is the pre-lab step. It takes a few minutes; run it now, before the arrays, so it is not on the critical path. If ZFS is already installed (zfs version works), skip to step 5.
dnf -y install https://zfsonlinux.org/epel/zfs-release-3-0.el10.noarch.rpm
What it does: adds the OpenZFS repository for Enterprise Linux 10. The file name is the EL10 release package, not a kernel module.
dnf -y install epel-release
What it does: adds EPEL, which supplies dependencies the ZFS packages expect.
dnf -y install kernel-devel-$(uname -r)
What it does: installs the headers for the running kernel. DKMS needs them to compile the module; without them the install appears to succeed but modprobe fails.
dnf -y install zfs
What it does: installs OpenZFS and its DKMS module, building the kernel module against the installed headers.
modprobe zfs
What it does: loads the module into the running kernel. Expected: no output. An error here is the install failure to fix before the ZFS steps.
zfs version
What it does: prints the userland and kernel module versions. The verified run reports zfs-2.2.11 and zfs-kmod-2.2.11; record the numbers in your evidence.
dnf -y install mdadm fio xfsprogs jq
What it does: re-checks the four tools after the ZFS install; on a fresh Droplet the earlier step already installed them, so this is fast and idempotent.
Step 5 — Baseline: local disk and one volume
mkdir -p /root/fio-local
What it does: creates the directory the local-disk test writes into.
mkdir -p /root/results
What it does: creates the results directory every test writes its JSON to.
The four fio commands below are the template for every configuration. Run them once against /root/fio-local, then again against each mount point, changing only --directory and the output name.
fio --name=seqread --directory=/root/fio-local --rw=read --bs=1M --size=256M \
  --numjobs=1 --iodepth=8 --runtime=10 --time_based --group_reporting \
  --output-format=json --output=/root/results/fio-local-disk-seqread.json
What it does: reads 1 MiB blocks sequentially for 10 seconds and writes the result as JSON. 1 MiB blocks and queue depth 8 approximate streaming video playback.
fio --name=seqwrite --directory=/root/fio-local --rw=write --bs=1M --size=256M \
  --numjobs=1 --iodepth=8 --runtime=10 --time_based --group_reporting \
  --output-format=json --output=/root/results/fio-local-disk-seqwrite.json
What it does: writes 1 MiB blocks sequentially for 10 seconds — the ingest pattern. On a network volume this is the write rate an ingest actually gets.
fio --name=randread --directory=/root/fio-local --rw=randread --bs=4k --size=256M \
  --numjobs=4 --iodepth=32 --runtime=10 --time_based --group_reporting \
  --output-format=json --output=/root/results/fio-local-disk-randread.json
What it does: issues 4 KiB random reads from four jobs at queue depth 32 for 10 seconds, approximating a database index lookup.
fio --name=randwrite --directory=/root/fio-local --rw=randwrite --bs=4k --size=256M \
  --numjobs=4 --iodepth=32 --runtime=10 --time_based --group_reporting \
  --output-format=json --output=/root/results/fio-local-disk-randwrite.json
What it does: issues 4 KiB random writes — the pattern where parity costs the most. Compare this number between RAID 5 and RAID 10.
mkfs.xfs -f /dev/disk/by-id/scsi-0DO_Volume_<vol1>
What it does: puts an XFS filesystem on the first whole volume. -f allows a reformat of the blank device; there is no partition table.
mkdir -p /mnt/base
What it does: creates the mount point for the single-volume baseline.
mount /dev/disk/by-id/scsi-0DO_Volume_<vol1> /mnt/base
What it does: mounts the XFS filesystem so fio can write files through the filesystem, which is the same path the array tests use.
fio --name=seqread --directory=/mnt/base --rw=read --bs=1M --size=256M \
  --numjobs=1 --iodepth=8 --runtime=10 --time_based --group_reporting \
  --output-format=json --output=/root/results/fio-single-volume-seqread.json
What it does: repeats the sequential read against the single volume and records it under its own configuration name.
fio --name=seqwrite --directory=/mnt/base --rw=write --bs=1M --size=256M \
  --numjobs=1 --iodepth=8 --runtime=10 --time_based --group_reporting \
  --output-format=json --output=/root/results/fio-single-volume-seqwrite.json
What it does: repeats the sequential write against the single volume.
fio --name=randread --directory=/mnt/base --rw=randread --bs=4k --size=256M \
  --numjobs=4 --iodepth=32 --runtime=10 --time_based --group_reporting \
  --output-format=json --output=/root/results/fio-single-volume-randread.json
What it does: repeats the random read against the single volume.
fio --name=randwrite --directory=/mnt/base --rw=randwrite --bs=4k --size=256M \
  --numjobs=4 --iodepth=32 --runtime=10 --time_based --group_reporting \
  --output-format=json --output=/root/results/fio-single-volume-randwrite.json
What it does: repeats the random write against the single volume.
umount /mnt/base
What it does: unmounts the baseline. An array cannot claim a volume that is still mounted.
Step 6 — mdadm RAID 5: three active disks plus a spare
mdadm --stop /dev/md5
mdadm --zero-superblock /dev/disk/by-id/scsi-0DO_Volume_<vol1>
mdadm --zero-superblock /dev/disk/by-id/scsi-0DO_Volume_<vol2>
mdadm --zero-superblock /dev/disk/by-id/scsi-0DO_Volume_<vol3>
mdadm --zero-superblock /dev/disk/by-id/scsi-0DO_Volume_<vol4>
mdadm --zero-superblock /dev/disk/by-id/scsi-0DO_Volume_<vol5>
What it does: stops any array named md5 left from an earlier attempt and clears the mdadm metadata from all five volumes. --stop on a non-existent array prints an error and continues; a stale superblock is what makes the next --create refuse a device.
mdadm --create /dev/md5 --level=5 --raid-devices=3 --spare-devices=1 --run \
  /dev/disk/by-id/scsi-0DO_Volume_<vol1> \
  /dev/disk/by-id/scsi-0DO_Volume_<vol2> \
  /dev/disk/by-id/scsi-0DO_Volume_<vol3> \
  /dev/disk/by-id/scsi-0DO_Volume_<vol4>
What it does: creates a RAID 5 array from three active devices (two data plus one parity) with the fourth as a hot spare. Usable capacity is about 20 GiB. --run starts it without waiting for confirmation.
cat /proc/mdstat
What it does: shows the array's live state. During the initial sync you will see [2/3] or [resync]; wait until it reads [3/3] [UUU] before benchmarking.
mdadm --detail /dev/md5
What it does: prints the member disks, their roles, and State : clean. Save this as the normal-state evidence.
mkdir -p /mnt/raid5
What it does: creates the mount point.
mkfs.xfs -f /dev/md5
What it does: puts XFS on the array, not on a member disk. Formatting a member would destroy the array.
mount /dev/md5 /mnt/raid5
What it does: mounts the array so the four fio tests can write through a filesystem.
fio --name=seqread --directory=/mnt/raid5 --rw=read --bs=1M --size=256M \
  --numjobs=1 --iodepth=8 --runtime=10 --time_based --group_reporting \
  --output-format=json --output=/root/results/fio-raid5-seqread.json
What it does: measures streaming read on the array. Compare with the single-volume row: RAID 5 reads can use more than one disk.
fio --name=seqwrite --directory=/mnt/raid5 --rw=write --bs=1M --size=256M \
  --numjobs=1 --iodepth=8 --runtime=10 --time_based --group_reporting \
  --output-format=json --output=/root/results/fio-raid5-seqwrite.json
What it does: measures streaming write; parity is computed per stripe, so this is usually below the read rate.
fio --name=randread --directory=/mnt/raid5 --rw=randread --bs=4k --size=256M \
  --numjobs=4 --iodepth=32 --runtime=10 --time_based --group_reporting \
  --output-format=json --output=/root/results/fio-raid5-randread.json
What it does: measures small random reads, which can be served from multiple disks in parallel.
fio --name=randwrite --directory=/mnt/raid5 --rw=randwrite --bs=4k --size=256M \
  --numjobs=4 --iodepth=32 --runtime=10 --time_based --group_reporting \
  --output-format=json --output=/root/results/fio-raid5-randwrite.json
What it does: measures small random writes; watch for the read-modify-write penalty relative to RAID 10.
Break a disk and watch the spare take over
echo 50000 > /proc/sys/dev/raid/speed_limit_min
What it does: raises the rebuild speed floor. The default is deliberately gentle; for a 20 GiB array in a lab, a faster rebuild finishes inside the session.
echo 200000 > /proc/sys/dev/raid/speed_limit_max
What it does: raises the ceiling above the floor so the kernel can use the available bandwidth.
mdadm --fail /dev/md5 /dev/disk/by-id/scsi-0DO_Volume_<vol1>
What it does: marks the first member as failed. The hot spare should begin rebuilding within seconds; this is the failure the array was built to absorb.
mdadm --detail /dev/md5
What it does: shows the degraded/recovering state: one device failed, the spare active. Save it as evidence.
cat /proc/mdstat
What it does: shows the rebuild progress in the [=>...] bar. Save this state before it disappears.
mdadm --remove /dev/md5 /dev/disk/by-id/scsi-0DO_Volume_<vol1>
What it does: removes the failed member from the array so it can be re-added as the new spare.
mdadm --zero-superblock /dev/disk/by-id/scsi-0DO_Volume_<vol1>
What it does: clears the old mdadm superblock so the kernel treats the disk as new. Skipping this is the usual cause of a re-add that is refused.
mdadm --add /dev/md5 /dev/disk/by-id/scsi-0DO_Volume_<vol1>
What it does: adds the repaired disk back as the new spare. The array now has three active members and one spare again.
mdadm --detail /dev/md5
What it does: confirms the array returned to [3/3] [UUU] and State : clean — the rebuild promise, tested.
cat /proc/mdstat
What it does: confirms no resync or recovery is still running. Only now is the array protected again.
Step 7 — mdadm RAID 6: four active disks plus a spare
umount /mnt/raid5
What it does: unmounts the RAID 5 array.
mdadm --stop /dev/md5
What it does: stops the array and releases the member devices for reuse.
mdadm --zero-superblock /dev/disk/by-id/scsi-0DO_Volume_<vol1>
mdadm --zero-superblock /dev/disk/by-id/scsi-0DO_Volume_<vol2>
mdadm --zero-superblock /dev/disk/by-id/scsi-0DO_Volume_<vol3>
mdadm --zero-superblock /dev/disk/by-id/scsi-0DO_Volume_<vol4>
mdadm --zero-superblock /dev/disk/by-id/scsi-0DO_Volume_<vol5>
What it does: clears each member's superblock before the next array is created. A leftover superblock can make --create refuse a device or, worse, assemble the old array.
mdadm --create /dev/md6 --level=6 --raid-devices=4 --spare-devices=1 --run \
  /dev/disk/by-id/scsi-0DO_Volume_<vol1> \
  /dev/disk/by-id/scsi-0DO_Volume_<vol2> \
  /dev/disk/by-id/scsi-0DO_Volume_<vol3> \
  /dev/disk/by-id/scsi-0DO_Volume_<vol4> \
  /dev/disk/by-id/scsi-0DO_Volume_<vol5>
What it does: creates RAID 6 from four active devices (two data plus two parity) and the fifth as a spare. It survives two failures and still yields about 20 GiB usable.
cat /proc/mdstat
What it does: shows the initial sync. Wait for [4/4] [UUUU] before measuring.
mdadm --detail /dev/md6
What it does: confirms four active members, one spare and State : clean.
mkdir -p /mnt/raid6
What it does: creates the mount point.
mkfs.xfs -f /dev/md6
What it does: formats the array with XFS.
mount /dev/md6 /mnt/raid6
What it does: mounts it for the four tests.
fio --name=seqread --directory=/mnt/raid6 --rw=read --bs=1M --size=256M \
  --numjobs=1 --iodepth=8 --runtime=10 --time_based --group_reporting \
  --output-format=json --output=/root/results/fio-raid6-seqread.json
What it does: measures sequential read on RAID 6.
fio --name=seqwrite --directory=/mnt/raid6 --rw=write --bs=1M --size=256M \
  --numjobs=1 --iodepth=8 --runtime=10 --time_based --group_reporting \
  --output-format=json --output=/root/results/fio-raid6-seqwrite.json
What it does: measures sequential write; two parity blocks cost more than RAID 5's one.
fio --name=randread --directory=/mnt/raid6 --rw=randread --bs=4k --size=256M \
  --numjobs=4 --iodepth=32 --runtime=10 --time_based --group_reporting \
  --output-format=json --output=/root/results/fio-raid6-randread.json
What it does: measures random reads on RAID 6.
fio --name=randwrite --directory=/mnt/raid6 --rw=randwrite --bs=4k --size=256M \
  --numjobs=4 --iodepth=32 --runtime=10 --time_based --group_reporting \
  --output-format=json --output=/root/results/fio-raid6-randwrite.json
What it does: measures random writes, where the dual-parity read-modify-write shows.
echo 50000 > /proc/sys/dev/raid/speed_limit_min
What it does: raises the rebuild speed floor for this array.
echo 200000 > /proc/sys/dev/raid/speed_limit_max
What it does: raises the ceiling.
mdadm --fail /dev/md6 /dev/disk/by-id/scsi-0DO_Volume_<vol1>
What it does: fails the first member; the spare starts rebuilding.
mdadm --detail /dev/md6
What it does: records the degraded/recovering state.
cat /proc/mdstat
What it does: records rebuild progress.
mdadm --remove /dev/md6 /dev/disk/by-id/scsi-0DO_Volume_<vol1>
What it does: removes the failed member.
mdadm --zero-superblock /dev/disk/by-id/scsi-0DO_Volume_<vol1>
What it does: clears its superblock.
mdadm --add /dev/md6 /dev/disk/by-id/scsi-0DO_Volume_<vol1>
What it does: re-adds it as the new spare.
mdadm --detail /dev/md6
What it does: confirms [4/4] [UUUU] and clean state after the rebuild.
cat /proc/mdstat
What it does: confirms the rebuild finished.
Step 8 — mdadm RAID 10: four active disks, fifth added on failure
umount /mnt/raid6
What it does: unmounts RAID 6.
mdadm --stop /dev/md6
What it does: stops the array.
mdadm --zero-superblock /dev/disk/by-id/scsi-0DO_Volume_<vol1>
mdadm --zero-superblock /dev/disk/by-id/scsi-0DO_Volume_<vol2>
mdadm --zero-superblock /dev/disk/by-id/scsi-0DO_Volume_<vol3>
mdadm --zero-superblock /dev/disk/by-id/scsi-0DO_Volume_<vol4>
mdadm --zero-superblock /dev/disk/by-id/scsi-0DO_Volume_<vol5>
What it does: clears the superblock on each of the five members before the RAID 10 array is created.
mdadm --create /dev/md10 --level=10 --raid-devices=4 --run \
  /dev/disk/by-id/scsi-0DO_Volume_<vol1> \
  /dev/disk/by-id/scsi-0DO_Volume_<vol2> \
  /dev/disk/by-id/scsi-0DO_Volume_<vol3> \
  /dev/disk/by-id/scsi-0DO_Volume_<vol4>
What it does: creates a RAID 10 array from four devices — two mirrored pairs, striped. There is no spare: usable capacity is 20 GiB and one failure per pair is survivable.
cat /proc/mdstat
What it does: shows the initial sync; wait for [4/4] [UUUU].
mdadm --detail /dev/md10
What it does: confirms the layout and clean state.
mkdir -p /mnt/raid10
What it does: creates the mount point.
mkfs.xfs -f /dev/md10
What it does: formats the array.
mount /dev/md10 /mnt/raid10
What it does: mounts it for the four tests.
fio --name=seqread --directory=/mnt/raid10 --rw=read --bs=1M --size=256M \
  --numjobs=1 --iodepth=8 --runtime=10 --time_based --group_reporting \
  --output-format=json --output=/root/results/fio-raid10-seqread.json
What it does: measures sequential read on the mirrored stripe.
fio --name=seqwrite --directory=/mnt/raid10 --rw=write --bs=1M --size=256M \
  --numjobs=1 --iodepth=8 --runtime=10 --time_based --group_reporting \
  --output-format=json --output=/root/results/fio-raid10-seqwrite.json
What it does: measures sequential write; every write goes to two disks, so the raw rate is half before striping.
fio --name=randread --directory=/mnt/raid10 --rw=randread --bs=4k --size=256M \
  --numjobs=4 --iodepth=32 --runtime=10 --time_based --group_reporting \
  --output-format=json --output=/root/results/fio-raid10-randread.json
What it does: measures random reads; either copy of a block can serve them.
fio --name=randwrite --directory=/mnt/raid10 --rw=randwrite --bs=4k --size=256M \
  --numjobs=4 --iodepth=32 --runtime=10 --time_based --group_reporting \
  --output-format=json --output=/root/results/fio-raid10-randwrite.json
What it does: measures random writes, the place RAID 10 is expected to beat RAID 5/6.
echo 50000 > /proc/sys/dev/raid/speed_limit_min
What it does: raises the rebuild speed floor.
echo 200000 > /proc/sys/dev/raid/speed_limit_max
What it does: raises the ceiling.
mdadm --fail /dev/md10 /dev/disk/by-id/scsi-0DO_Volume_<vol1>
What it does: fails one member of the first mirror pair. There is no spare, so the array stays degraded until you add the fifth volume by hand.
mdadm --detail /dev/md10
What it does: records the degraded state — this is the window a hot spare would have shortened.
cat /proc/mdstat
What it does: shows [4/3] [UU_U] or similar: still serving, one member short.
mdadm --remove /dev/md10 /dev/disk/by-id/scsi-0DO_Volume_<vol1>
What it does: removes the failed member.
mdadm --zero-superblock /dev/disk/by-id/scsi-0DO_Volume_<vol1>
What it does: clears the failed member's superblock.
mdadm --add /dev/md10 /dev/disk/by-id/scsi-0DO_Volume_<vol5>
What it does: adds the fifth volume as the replacement and begins the rebuild. Note the disk changing: RAID 10 needs a new disk, not the failed one back.
mdadm --detail /dev/md10
What it does: confirms the array returned to [4/4] [UUUU] and clean state.
cat /proc/mdstat
What it does: confirms the rebuild finished.
Step 9 — ZFS raidz1: three disks, offline and replace
umount /mnt/raid10
What it does: unmounts the RAID 10 array.
mdadm --stop /dev/md10
What it does: stops it and releases the members.
mdadm --zero-superblock /dev/disk/by-id/scsi-0DO_Volume_<vol1>
mdadm --zero-superblock /dev/disk/by-id/scsi-0DO_Volume_<vol2>
mdadm --zero-superblock /dev/disk/by-id/scsi-0DO_Volume_<vol3>
mdadm --zero-superblock /dev/disk/by-id/scsi-0DO_Volume_<vol4>
mdadm --zero-superblock /dev/disk/by-id/scsi-0DO_Volume_<vol5>
What it does: clears the mdadm metadata on all five volumes; the ZFS pool must not see a foreign RAID signature.
wipefs -a /dev/disk/by-id/scsi-0DO_Volume_<vol1>
wipefs -a /dev/disk/by-id/scsi-0DO_Volume_<vol2>
wipefs -a /dev/disk/by-id/scsi-0DO_Volume_<vol3>
wipefs -a /dev/disk/by-id/scsi-0DO_Volume_<vol4>
wipefs -a /dev/disk/by-id/scsi-0DO_Volume_<vol5>
What it does: wipes any remaining filesystem or RAID signature from each volume; ZFS refuses a device with a foreign signature.
zpool create -f tank1 raidz1 /dev/disk/by-id/scsi-0DO_Volume_<vol1> /dev/disk/by-id/scsi-0DO_Volume_<vol2> /dev/disk/by-id/scsi-0DO_Volume_<vol3>
What it does: creates pool tank1 with one three-disk raidz1 vdev. It survives one disk failure and yields about 20 GiB usable.
zfs create tank1/data
What it does: creates a dataset inside the pool; fio writes into the dataset, which is how ZFS is normally used.
fio --name=seqread --directory=/tank1/data --rw=read --bs=1M --size=256M \
  --numjobs=1 --iodepth=8 --runtime=10 --time_based --group_reporting \
  --output-format=json --output=/root/results/fio-zfs-raidz1-seqread.json
What it does: measures sequential read through ZFS. Checksums and the ARC are in this path, unlike the raw mdadm path.
fio --name=seqwrite --directory=/tank1/data --rw=write --bs=1M --size=256M \
  --numjobs=1 --iodepth=8 --runtime=10 --time_based --group_reporting \
  --output-format=json --output=/root/results/fio-zfs-raidz1-seqwrite.json
What it does: measures sequential write; copy-on-write allocates new blocks instead of overwriting.
fio --name=randread --directory=/tank1/data --rw=randread --bs=4k --size=256M \
  --numjobs=4 --iodepth=32 --runtime=10 --time_based --group_reporting \
  --output-format=json --output=/root/results/fio-zfs-raidz1-randread.json
What it does: measures random reads; the ARC and the checksummed block layout are visible here.
fio --name=randwrite --directory=/tank1/data --rw=randwrite --bs=4k --size=256M \
  --numjobs=4 --iodepth=32 --runtime=10 --time_based --group_reporting \
  --output-format=json --output=/root/results/fio-zfs-raidz1-randwrite.json
What it does: measures random writes; expect this to be ZFS's weakest number because every small write allocates and checksums a new block.
zpool status tank1
What it does: shows the pool ONLINE and the vdev with three devices. Save it as the normal-state evidence.
zpool offline tank1 /dev/disk/by-id/scsi-0DO_Volume_<vol1>
What it does: takes one disk out of the vdev without failing the pool. This is the controlled failure — the pool is now DEGRADED and still serves reads and writes.
zpool status tank1
What it does: shows the degraded state and the offline device. Save it.
zpool replace tank1 /dev/disk/by-id/scsi-0DO_Volume_<vol1> /dev/disk/by-id/scsi-0DO_Volume_<vol4>
What it does: replaces the offline disk with the fourth volume and starts the resilver. Note that ZFS rebuilds the allocated blocks, not the whole disk.
zpool status tank1
What it does: shows the resilver in progress and how much data is being scanned. Save it as the resilvering evidence.
zpool status tank1
What it does: wait until the same command shows resilvered and both vdev members ONLINE. This is the promise tested; save the completed state.
Step 10 — ZFS raidz2: four disks, survive two
zpool destroy -f tank2
What it does: destroys any tank2 left by an earlier attempt, so the next create starts from a clean name.
zpool destroy -f tank1
What it does: destroys the first pool. Double-check the pool name: there is no undo for a destroy.
wipefs -a /dev/disk/by-id/scsi-0DO_Volume_<vol1>
wipefs -a /dev/disk/by-id/scsi-0DO_Volume_<vol2>
wipefs -a /dev/disk/by-id/scsi-0DO_Volume_<vol3>
wipefs -a /dev/disk/by-id/scsi-0DO_Volume_<vol4>
wipefs -a /dev/disk/by-id/scsi-0DO_Volume_<vol5>
What it does: wipes any leftover label from each volume before the next pool is created.
zpool create -f tank2 raidz2 /dev/disk/by-id/scsi-0DO_Volume_<vol1> /dev/disk/by-id/scsi-0DO_Volume_<vol2> /dev/disk/by-id/scsi-0DO_Volume_<vol3> /dev/disk/by-id/scsi-0DO_Volume_<vol4>
What it does: creates pool tank2 with one four-disk raidz2 vdev — two parity blocks, two failures survivable, about 20 GiB usable.
zfs create tank2/data
What it does: creates the dataset for the tests.
fio --name=seqread --directory=/tank2/data --rw=read --bs=1M --size=256M \
  --numjobs=1 --iodepth=8 --runtime=10 --time_based --group_reporting \
  --output-format=json --output=/root/results/fio-zfs-raidz2-seqread.json
What it does: measures sequential read on raidz2.
fio --name=seqwrite --directory=/tank2/data --rw=write --bs=1M --size=256M \
  --numjobs=1 --iodepth=8 --runtime=10 --time_based --group_reporting \
  --output-format=json --output=/root/results/fio-zfs-raidz2-seqwrite.json
What it does: measures sequential write; two parity blocks cost write bandwidth.
fio --name=randread --directory=/tank2/data --rw=randread --bs=4k --size=256M \
  --numjobs=4 --iodepth=32 --runtime=10 --time_based --group_reporting \
  --output-format=json --output=/root/results/fio-zfs-raidz2-randread.json
What it does: measures random reads on raidz2.
fio --name=randwrite --directory=/tank2/data --rw=randwrite --bs=4k --size=256M \
  --numjobs=4 --iodepth=32 --runtime=10 --time_based --group_reporting \
  --output-format=json --output=/root/results/fio-zfs-raidz2-randwrite.json
What it does: measures random writes; compare the cost with raidz1's single parity.
zpool status tank2
What it does: shows the pool online with four devices. Save it.
zpool offline tank2 /dev/disk/by-id/scsi-0DO_Volume_<vol1>
What it does: takes one disk offline; raidz2 remains DEGRADED but still has one parity block to spare.
zpool status tank2
What it does: records the degraded state.
zpool replace tank2 /dev/disk/by-id/scsi-0DO_Volume_<vol1> /dev/disk/by-id/scsi-0DO_Volume_<vol5>
What it does: replaces it with the fifth volume and starts the resilver.
zpool status tank2
What it does: records the resilver progress.
zpool status tank2
What it does: wait for resilvered and all four devices ONLINE; save the completed state.
Step 11 — Collect the summary and leave the Droplet
cat /root/results/summary.csv
What it does: prints the 28 measurements — seven configurations × four tests — that the notebook pivots. If a row is missing, run the missing fio command again.
lsblk -o NAME,SIZE,TYPE,SERIAL,MOUNTPOINT
What it does: captures the final device state for the evidence bundle.
exit
What it does: closes the SSH session and returns you to the laptop.
mkdir -p results
What it does: creates a local folder for the raw evidence on the laptop.
scp -i <private-key> -r root@<droplet-ip>:/root/results/. results/
What it does: copies every fio JSON, mdadm/ZFS status file and the command logs from the Droplet. This must happen before teardown; deleting the Droplet deletes the evidence.
bash verify.sh
What it does: checks the collected evidence: 28 summary rows, 28 fio JSON files, the rebuild and resilver states, the empty teardown lists and the balance. It exits non-zero if anything is missing. (OUT=results is the default; set OUT=results if you copied elsewhere.)
Step 12 — Teardown
ssh -i <private-key> root@<droplet-ip> "bash /root/remote.sh cleanup"
What it does: unmounts every array and dataset, exports the pools and stops mdadm so the volumes are released cleanly. remote.sh cleanup runs the three commands below; run them by hand if you did not copy the script.
umount /mnt/raid5 /mnt/raid6 /mnt/raid10 /mnt/base /tank1/data /tank2/data
What it does: releases every mount point in one call, including the two ZFS datasets. An unmount that reports "not mounted" is harmless when an earlier step already released it.
zpool export -a
What it does: exports every imported pool so ZFS releases the member volumes; a volume held by an imported pool cannot be deleted cleanly.
mdadm --stop --scan
What it does: stops every running md array so the kernel releases its member volumes.
doctl compute droplet delete <droplet-id> --force
What it does: deletes the Droplet. The volumes survive this and keep billing until step 12.4.
doctl compute droplet get <droplet-id>
What it does: confirms the Droplet is gone; expected: a "not found" error. A successful response means the delete has not completed, and deleting volumes now may fail while they are still attached.
doctl compute volume delete <vol1-id> --force
doctl compute volume delete <vol2-id> --force
doctl compute volume delete <vol3-id> --force
doctl compute volume delete <vol4-id> --force
doctl compute volume delete <vol5-id> --force
What it does: deletes all five volumes. A volume that is still attached may refuse once while the Droplet releases; wait a few seconds and retry. Delete, do not detach — a detached volume still bills.
doctl compute firewall delete <firewall-id> --force
What it does: deletes the week:3 firewall.
doctl compute ssh-key delete <key-id> --force
What it does: deletes the throwaway key the reference run imported. Skip this if you used your own S1 key: that key stays for the rest of the course.
doctl compute droplet list -o json > results/droplet-after.json
What it does: records the empty Droplet list as teardown proof.
doctl compute volume list -o json > results/volume-after.json
What it does: records the empty volume list. This is the proof that nothing billable is left.
doctl compute firewall list -o json > results/firewall-after.json
What it does: records the firewall list without your rule.
doctl balance get
What it does: shows the account balance and month-to-date usage. Record it; the run must stay under $0.20.
Evidence bundle
Submit the ten items listed under Task, plus the notebook's storage_results.json. The 150–250-word note must answer: which layout would you put the weekly working set on, which would you not, and what did the rebuild or resilver time tell you that the capacity table did not?
Fallback chain
| Failure |
Fallback (same evidence shape) |
| The token lacks volume scopes |
Create the token again with block_storage:*; custom scopes cannot be edited after creation. Or use the panel for volumes and keep the CLI for the rest. |
doctl blocked or not installed |
Panel path for Droplets, volumes and firewalls; volume tags are CLI-only, so record that as a deviation. |
| Five volumes refused |
Create three 10 GiB volumes and run raidz1 only; label the missing configurations in the evidence. |
| ZFS install fails |
Reinstall kernel-devel-$(uname -r), run modprobe zfs, and retry dnf -y install zfs. If it still fails, complete the three mdadm arrays and use the published ZFS numbers in data/ for the ZFS rows, labelled as a fallback. |
| RAID 5/6 has no spare capacity on the account |
Run the array without a spare and add a volume at failure; record that the degraded window was longer. |
| No account at all |
Instructor demo account with a booked slot; the evidence stays individual. |
Teardown checklist
- Droplet deleted.
- All five volumes deleted (not detached).
week:3 firewall deleted.- The imported throwaway SSH key deleted (reference run only).
results/droplet-after.json, results/volume-after.json and results/firewall-after.json empty.doctl balance get recorded.- The project, your S1 key and the spend alert stay; the scoped token may stay until it expires or be deleted deliberately.